Battery switch on travel trailer function is crucial for managing your RV’s power. Understanding how these switches work—whether single, dual, or rotary—is key to preventing battery drain and ensuring reliable power for your appliances and lights. This guide breaks down the different types, their pros and cons, troubleshooting tips, and safe operating procedures, helping you become a power management pro.
We’ll cover everything from the basics of how a battery switch isolates your house batteries from your tow vehicle to more advanced features like remote control and multiple battery bank configurations. Learn how to properly maintain your switch to extend battery life and avoid costly repairs.
Battery Switch Types in Travel Trailers
Choosing the right battery switch for your travel trailer is crucial for managing your power sources efficiently and safely. Different types offer varying levels of control and complexity, each with its own set of pros and cons. Understanding these differences will help you select the best option for your needs.
Single Battery Switch
A single battery switch is the simplest type, offering a single on/off control for your trailer’s battery. This is ideal for setups with only one battery, providing a straightforward method to disconnect the battery from the trailer’s electrical system. This prevents parasitic drain when the trailer isn’t in use.Advantages: Simple, inexpensive, easy to install.Disadvantages: Limited functionality; only suitable for single-battery systems; no ability to isolate or switch between batteries.
Dual Battery Switch
Dual battery switches allow you to manage two batteries independently. This is common in travel trailers with a house battery (for appliances) and a starting battery (for the vehicle). You can isolate each battery, connect both to the trailer system, or even use one to charge the other.Advantages: Independent control over two batteries; allows for charging one battery from the other; protects against parasitic drain on either battery.Disadvantages: More complex than a single switch; slightly more expensive; requires more wiring.
Rotary Battery Switch, Battery switch on travel trailer function
Rotary switches offer multiple positions, allowing for more granular control over multiple batteries. They usually offer positions for connecting different combinations of batteries, such as “both batteries on,” “house battery only,” “starting battery only,” and “both batteries off.” Some even incorporate a “charge” position to allow one battery to charge the other.Advantages: Versatile control over multiple batteries; allows for optimized battery usage and charging; can improve battery lifespan.Disadvantages: Most complex type; can be more expensive; requires more wiring and potentially more technical expertise for installation.
Comparison Table
| Feature | Single Battery Switch | Dual Battery Switch | Rotary Battery Switch |
|---|---|---|---|
| Number of Batteries Controlled | One | Two | Two or more (depending on the switch) |
| Control Options | On/Off | On/Off for each battery, both on, both off | Multiple combinations (e.g., both on, house only, start only, off) |
| Typical Cost | Low | Medium | Medium to High |
| Installation Complexity | Low | Medium | High |
Function and Purpose of the Battery Switch: Battery Switch On Travel Trailer Function

The battery switch in your travel trailer is a crucial component for managing power flow and protecting your batteries. It acts as a central control, allowing you to easily disconnect or connect your house batteries from the rest of the electrical system, offering significant benefits in terms of power management and preventing damage.The primary function of the battery switch is to isolate the house batteries from the trailer’s electrical system and the tow vehicle’s charging system.
This isolation is vital for several reasons, including preventing unwanted battery drain and protecting the batteries themselves from overcharging or discharging. Think of it as a master power switch specifically for your house batteries. It allows you to completely cut off power to the batteries when the trailer isn’t in use, preventing a slow drain that could leave you with a dead battery when you’re ready to hit the road.
Battery Isolation and Charging System Management
The battery switch effectively breaks the electrical connection between the house batteries and the charging system of your tow vehicle. This prevents the house batteries from constantly drawing power from the vehicle’s alternator, even when the trailer is not connected to shore power. This is particularly important for longer trips or periods of storage, as it prevents the vehicle’s battery from being drained.
When the switch is in the “off” position, the house batteries are completely isolated, protecting them from accidental discharge through the trailer’s wiring. When the switch is turned “on,” the batteries become part of the trailer’s electrical circuit and can be charged by either the tow vehicle or shore power.
Preventing Battery Drain During Storage
Leaving your travel trailer’s battery switch in the “on” position while the trailer is in storage for extended periods can lead to a completely drained battery. Even with minimal parasitic loads (small amounts of power draw from devices in standby mode), a slow but steady drain will eventually render your batteries unusable. The battery switch acts as a safeguard, allowing you to completely disconnect the house batteries, thereby preventing this drain and ensuring that your batteries retain their charge for longer periods.
This is particularly important if your trailer is equipped with features that draw power even when not in use, such as a clock or carbon monoxide detector. By turning the switch “off,” you eliminate this parasitic drain and preserve battery life.
Troubleshooting Common Battery Switch Issues
Your travel trailer’s battery switch is a crucial component, ensuring you can easily switch between your trailer’s battery and shore power or disconnect the battery entirely. Problems with this switch can leave you stranded without power, so understanding common issues and how to troubleshoot them is essential. This section will guide you through identifying and resolving typical battery switch malfunctions.
Battery switch problems usually stem from a few key areas: corrosion, loose connections, and the switch itself failing. Corrosion, caused by exposure to the elements, creates resistance and can prevent proper current flow. Loose connections, whether at the switch terminals or the battery cables, can also lead to intermittent power or complete failure. Finally, the switch mechanism itself can wear out or become damaged, preventing it from functioning correctly.
Let’s explore how to diagnose these issues.
Identifying Common Problems
Before diving into troubleshooting, a visual inspection is crucial. Carefully examine the battery switch, paying close attention to the terminals and connections. Look for signs of corrosion – a white, powdery substance or green, fuzzy growth. Also, check for any loose or damaged wires. Gently wiggle the cables connected to the switch to see if there’s any play indicating a loose connection.
If the switch itself feels loose or wobbly in its mounting, that’s another potential problem area. Inspect the switch lever; it should move smoothly and decisively between positions.
Troubleshooting Steps for Battery Switch Malfunctions
A systematic approach to troubleshooting will help pinpoint the source of the problem efficiently. The following steps Artikel a logical process to follow:
- Visual Inspection: As previously mentioned, thoroughly examine the switch and all connections for corrosion, loose wires, or physical damage.
- Clean Connections: If corrosion is present, use a wire brush or sandpaper to clean the terminals and battery posts. Apply a corrosion inhibitor to prevent future buildup. Ensure all connections are tight and secure.
- Test for Continuity: Use a multimeter to check for continuity between the switch terminals in each position. If there’s no continuity when the switch should be connected, the switch itself may be faulty.
- Check Voltage: With the switch in the “on” position, measure the voltage at the battery terminals and at the load (e.g., lights, appliances). A significant voltage drop indicates a problem in the wiring or connections between the switch and the load.
- Inspect Wiring: Carefully trace the wiring from the switch to the battery and the load. Look for any breaks, damage, or loose connections in the wiring harness.
- Replace the Switch: If all other checks are satisfactory and the problem persists, the switch itself is likely faulty and needs to be replaced.
Troubleshooting Flowchart
This flowchart provides a visual representation of the troubleshooting process. Following this sequence will help you efficiently diagnose and resolve battery switch issues.
[Imagine a flowchart here. The flowchart would begin with a “Start” box. It would then branch to “Visual Inspection (Corrosion, Loose Connections, Damage)”. If problems are found, it would lead to “Clean Connections”. If problems persist after cleaning, it would lead to “Test for Continuity”.
If continuity is good, it would lead to “Check Voltage”. If low voltage is detected, it would lead to “Inspect Wiring”. If high voltage is detected or continuity is bad, it would lead to “Replace Switch”. If no problems are found in the initial visual inspection, it would lead to a “No Issues Found” end box. All paths would ultimately lead to an “End” box.]
So, you’re planning a trip? Awesome! First things first: get yourself sorted with travel insurance. Check out Aon travel insurance for solid coverage. Then, think about your in-flight entertainment. If you’re an audiophile, you’ll want to check out a great audiophile travel setup to make those long flights a breeze.
Proper planning makes for a smoother trip!
Safe Battery Switch Operation and Maintenance
Proper operation and regular maintenance of your travel trailer’s battery switch are crucial for preventing electrical hazards and ensuring the longevity of your battery system. Neglecting these aspects can lead to premature battery failure, electrical fires, or even personal injury. This section details safe practices and a maintenance schedule to keep your system running smoothly and safely.Safe Battery Switch Operation Procedures emphasize disconnecting the battery system completely when working on any electrical components in your travel trailer to prevent accidental shocks.
Always ensure the switch is in the “OFF” position before performing any maintenance or repairs. This simple step is the most effective way to avoid electrical hazards. When connecting or disconnecting components, always connect or disconnect the ground (negative) connection first.
Safe Operation Procedures
Before working on any electrical system, including the battery switch, always turn off the main battery switch. This will disconnect the power source to your entire system, preventing accidental shocks or short circuits. If you’re unsure about any aspect of working with your electrical system, consult a qualified RV technician. Remember, safety should always be your top priority.
Always wear appropriate safety glasses to protect your eyes from any potential sparks or debris. When working near the battery, ensure the area is well-ventilated to prevent the buildup of explosive hydrogen gas. Always use insulated tools to avoid electrical shock.
Routine Maintenance Schedule
A regular maintenance schedule will extend the life of your battery switch and prevent potential problems. Visual inspection should be part of your pre-trip checklist, looking for any signs of corrosion, loose connections, or damage to the switch itself. Cleaning the battery terminals and switch contacts regularly is also crucial. This helps to prevent corrosion buildup, which can impede current flow and lead to overheating or failure.
- Monthly Inspection: Visually inspect the battery switch for any signs of damage, corrosion, or loose connections. Check the surrounding area for any signs of leaking battery acid.
- Quarterly Cleaning: Clean the battery terminals and switch contacts using a wire brush and baking soda solution. This will remove any corrosion buildup and ensure a good electrical connection.
- Annual Inspection and Testing: Have a qualified RV technician inspect and test the battery switch to ensure it’s functioning correctly. This includes checking the switch’s amperage rating and ensuring it can handle the load of your battery bank.
Battery Switch Replacement
Replacing a faulty battery switch is a relatively straightforward process, but it’s important to follow proper safety procedures. Before starting, always disconnect the battery system completely by turning off the main battery switch. Gather the necessary tools: a screwdriver (appropriate for the switch’s screws), wire cutters/strippers (if needed for new wiring), and a new battery switch of the correct amperage rating.
- Disconnect the Battery: Turn off the main battery switch and disconnect the negative (-) battery cable first, followed by the positive (+) cable.
- Remove the Old Switch: Carefully remove the screws holding the old battery switch in place. Take note of the wiring configuration before disconnecting any wires.
- Install the New Switch: Mount the new battery switch securely in its designated location. Connect the wires according to the wiring diagram or the markings on the switch. Ensure all connections are tight and secure.
- Reconnect the Battery: Connect the positive (+) battery cable first, followed by the negative (-) cable. Turn the main battery switch back on.
- Test the Switch: Verify the new switch is functioning correctly by checking the voltage at the battery and various outlets in your travel trailer.
Battery Switch and Electrical System Integration
The battery switch isn’t an isolated component in your travel trailer’s electrical system; it’s the central control point for your DC power. Understanding its interaction with other parts is key to efficient power management and preventing issues. This section details how the battery switch works with your converter, inverter, and solar panels, impacting your overall power flow.The battery switch acts as a gatekeeper for your trailer’s 12-volt DC power, sourced primarily from your house batteries.
When the switch is in the “on” position, it connects the batteries to the rest of the trailer’s DC circuits. This allows power to flow to things like interior lights, water pumps, and refrigerators (if they run on 12V). Turning the switch “off” completely disconnects the batteries, preventing drain and protecting them from discharge, especially during long periods of storage.
Converter Interaction
The converter is a crucial component that transforms the 12V DC power from your batteries into 120V AC power needed for many appliances. The battery switch directly influences the converter’s operation. With the switch “off,” the converter won’t have access to the battery power needed to operate, even if it’s plugged into shore power. The converter primarily uses the batteries for its own operation when shore power isn’t available.
In that case, the battery switch must be on for the converter to function properly and charge the batteries.
Inverter Interaction
An inverter converts 12V DC power from your batteries into 120V AC power, enabling you to run AC appliances when not connected to shore power. Similar to the converter, the inverter requires the battery switch to be “on” to function. Without the switch connecting the batteries, the inverter has no power source. The inverter draws significant current, so a properly functioning battery switch is crucial to prevent overload and potential damage to the system.
Solar Panel Integration
If your travel trailer has solar panels, they typically charge the batteries directly. The battery switch’s position affects how this charging happens. Even with the battery switch “off,” the solar panels might still charge the batteries (depending on the system design). However, having the switch “on” generally allows for more efficient charging as it connects the solar charge controller to the battery bank.
Some systems may have a dedicated solar charging pathway that bypasses the battery switch entirely.
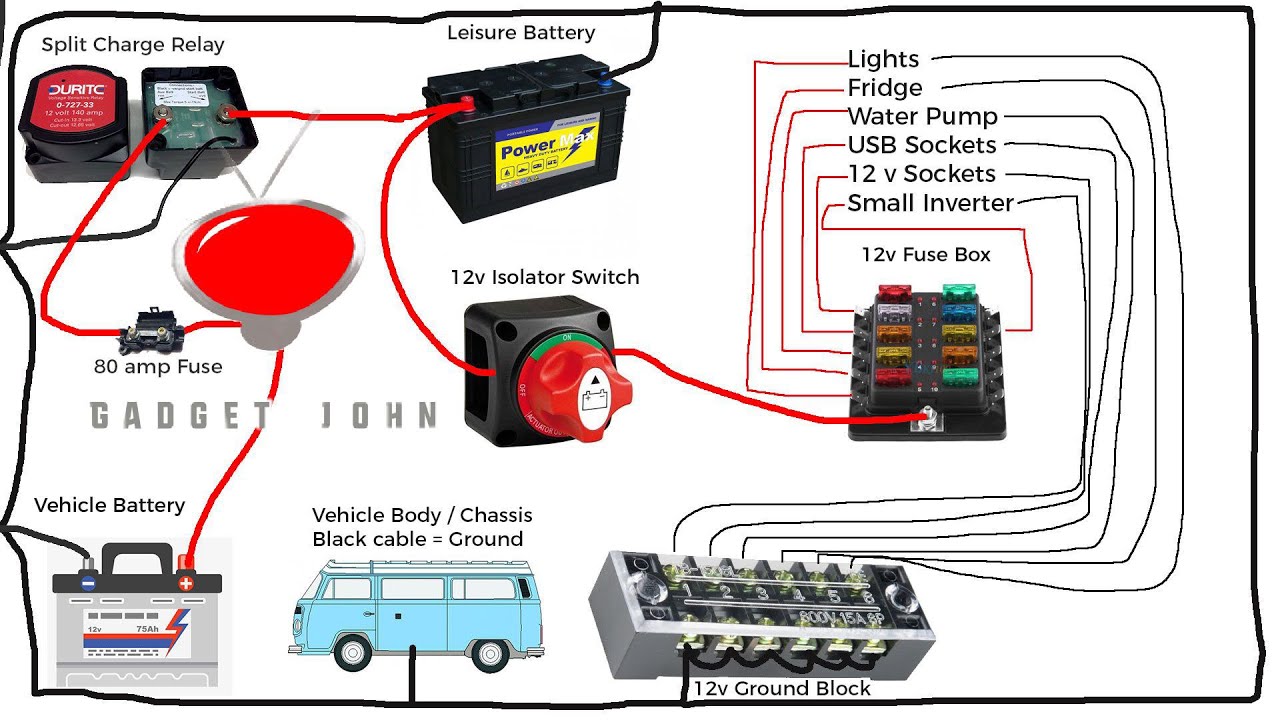
Diagram of Electrical System Connections
A simplified diagram would show the battery switch as a central hub. Lines would extend from the switch to the following: House Batteries, Converter, Inverter, and Solar Charge Controller. A separate line from the converter would go to the AC panel, distributing power to AC appliances. A separate line from the solar charge controller would go to the solar panels.
The battery switch’s position (on/off) directly determines whether the current flows through these connections. When the switch is “off,” the lines leading to the converter, inverter, and potentially even the solar charge controller would be effectively interrupted, preventing power flow to those components. When the switch is “on,” the current flows freely, enabling the normal operation of these components.
So, you’re planning a trip? Awesome! First things first: get yourself sorted with travel insurance. Check out Aon travel insurance for comprehensive coverage. Then, think about your in-flight entertainment; if you’re an audiophile, consider setting up a killer audiophile travel setup – noise-cancelling headphones are a must! Proper planning makes for a smoother, more enjoyable journey.
Don’t forget to pack your chargers!
Impact of Battery Switch on Battery Life
Your travel trailer’s battery switch plays a surprisingly significant role in the longevity of your batteries. Proper use can dramatically extend their lifespan, while improper handling can lead to premature failure and costly replacements. Understanding how the switch impacts your batteries is key to maximizing your investment and minimizing downtime.Proper use of a battery switch primarily involves minimizing parasitic drain and ensuring proper charging.
Leaving the switch in the “on” position when not actively using the trailer allows for constant, albeit small, current draw from the batteries, slowly depleting their charge. This constant drain accelerates sulfation, a process that reduces battery capacity and ultimately shortens their lifespan. Conversely, using the switch correctly, turning it off when the trailer isn’t in use, prevents this slow discharge and keeps the batteries healthier for longer.
Battery Switch Types and Their Effects on Battery Health
Different battery switch types offer varying levels of protection and impact on battery health. A simple on/off switch provides basic protection, preventing complete discharge. However, more advanced switches, such as those with multiple positions (like “off,” “battery,” “battery & shore power,” and “shore power only”), allow for more precise control, optimizing charging and minimizing parasitic drain. These sophisticated switches often include features that prevent overcharging or reverse polarity issues, both of which can severely damage batteries.
For example, a switch with a dedicated “shore power only” position ensures that the house batteries aren’t subjected to prolonged charging from the alternator when the trailer is connected to shore power, preventing overcharging and extending their lifespan. In contrast, a basic on/off switch offers less control and may contribute to faster battery degradation if not used carefully.
Impact of Incorrect Battery Switch Usage
Incorrect usage of the battery switch often manifests in several ways, all leading to premature battery failure. Leaving the switch in the “on” position for extended periods when the trailer isn’t in use, as mentioned previously, is a common culprit. This constant draw depletes the batteries, leading to sulfation and reduced capacity. Another issue is failing to properly isolate the batteries when connecting to shore power or using a generator.
This can lead to overcharging, which generates excessive heat and damages the battery cells. Furthermore, neglecting to check the switch’s operation and connections regularly can result in corrosion or loose connections, leading to voltage drops and increased battery stress. In essence, improper use of the battery switch accelerates the natural degradation process of the batteries, significantly shortening their useful life.
Advanced Battery Switch Features and Configurations
Upgrading your travel trailer’s battery system beyond a basic switch opens up a world of convenience and control. Advanced features and configurations allow for more efficient power management and provide greater peace of mind while boondocking or off-grid. This section will explore some of these advanced options.
Many modern battery switches offer functionalities that simplify battery management and provide valuable insights into your power system’s health. These features go beyond simple on/off switching, improving both usability and safety.
Remote Control and Monitoring Capabilities
Remote battery switches allow you to control your battery banks from a distance, often via a wireless remote or a smartphone app. This is incredibly useful for managing your batteries without having to crawl under your travel trailer. Some systems even provide real-time monitoring of battery voltage, amperage, and state of charge, enabling proactive power management and preventing unexpected battery drain.
Imagine being able to check your battery levels from inside your RV, or even from a distance while you’re out exploring! This level of control significantly reduces the risk of unexpected power outages.
Multiple Battery Bank Configurations
Many RVers use multiple battery banks – one for house power and another for starting the vehicle’s engine. Advanced battery switches can handle this setup seamlessly, allowing you to isolate, combine, or prioritize power sources as needed. Some switches can manage three or even more battery banks, providing ultimate flexibility for larger RVs or those with extensive power needs.
A common configuration is a main house battery bank and a smaller dedicated battery for the chassis. This setup ensures that the chassis battery always has enough power to start the vehicle, even if the house batteries are depleted.
Advanced Battery Switch Models: Specifications and Benefits
| Model | Number of Banks | Remote Control | Monitoring Capabilities | Other Features | Benefits |
|---|---|---|---|---|---|
| Example Model A (Hypothetical) | 2 | Wireless Remote | Voltage, Amperage, State of Charge | Overload Protection, Low Voltage Disconnect | Easy control, prevents over-discharge, extends battery life. |
| Example Model B (Hypothetical) | 3 | Smartphone App | Voltage, Amperage, State of Charge, Battery Temperature | Automatic charging prioritization, data logging | Comprehensive monitoring, intelligent charging, data analysis for predictive maintenance. |
| Example Model C (Hypothetical) | 1 (with multiple outputs) | None (local switch only) | None | Heavy-duty construction, high amperage rating | Simple, reliable, cost-effective solution for a single battery bank with multiple loads. |
| Example Model D (Hypothetical) | 4 | Wireless Remote & Smartphone App | Voltage, Amperage, State of Charge, Battery Temperature, Load Monitoring | Automatic charging profiles, remote firmware updates, integration with solar charge controllers | Highly customizable, advanced monitoring and control, future-proof technology. |
Mastering your travel trailer’s battery switch is about more than just flipping a switch; it’s about understanding your RV’s electrical system and ensuring reliable power for your adventures. By understanding the different types of switches, troubleshooting common issues, and performing regular maintenance, you can keep your batteries healthy and your RV running smoothly for years to come. So, get to know your battery switch – it’s your key to happy camping!
FAQ Insights
Can I use a battery switch with solar panels?
Yes, but proper wiring is crucial. Consult a wiring diagram specific to your setup. Incorrect wiring can damage your solar panels or other components.
How often should I clean my battery switch?
At least once a year, or more frequently if you notice corrosion. Clean with a wire brush and baking soda solution.
What size battery switch do I need?
The required amperage rating depends on your battery bank’s capacity. Consult a qualified electrician to determine the correct size for your specific setup.
My battery switch is stuck. What should I do?
Try lubricating the switch mechanism with a penetrating lubricant. If it’s still stuck, you likely need to replace the switch.
